Today, the recent advancement of payment gateways has revolutionized the transactional process of the business marketplace. Nowadays, the digital payment process tends to cater to the new heights of the next level. If you have planned to take your business online, you will also require highly efficient payment methods.
However, you don’t need to be cautious about your search for optimal international payment gateways to fulfill your brand’s consequences and vice versa. Hence, in this article, we’ll discuss how to integrate the Stripe Payment Gateway into your WordPress platform.

What is the Stripe Payment Gateway?
Stripe is a popular and well-integrated payment gateway used by over three million websites across the globe. It is a payment gateway that allows your potential customers to safely and effectively transfer funds from their credit cards or bank accounts in multiple currencies. Also, it helps them to make both one-time and subscription-based payments and also enables other additional services that include bills, invoicing, and sales tax-based automation.
Interestingly, if your business wants to accept in-person payments, you can also do this from your stripe terminal along with the company’s POS system. As a result, Stripe is the perfect and most robust solution for processing online and offline payments. In particular, Stripe’s developer-friendly API is rich and robust, and it has a result-intensive URL and HTTP that easily regulates errors in your code. Hence, the solution that Stripe.js offers is very beneficial for the developers, but more on that in later stages.
Steps to Integrate Stripe Payment Gateway to WordPress Website?
To connect Stripe Payment Gateway to your WordPress site using the WPFormify plugin. Following are some of the steps required to integrate the stripe payment gateway:
Step # 1
In the test mode:
- Go to Stripe Connect.
- Select Test Payment Type.
- Open ‘Stripe Sandbox Dashboard’ in a new tab.
- Click on the ‘Connect Stripe (sandbox)’ button.
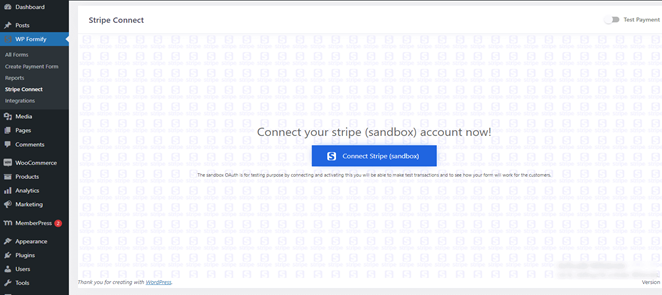
- User will be redirected to the plugin page.
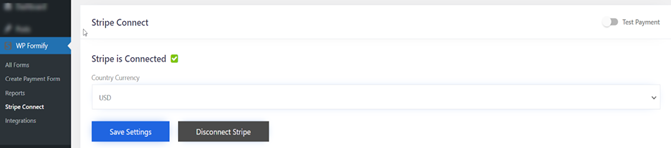
- Choose ‘Test Payment Mode.’
- Select ‘Currency.’
- Click on ‘Save Settings.’
Step # 2:
In this live mode:
- Hover to Square Connect.
- Turn on the Toggle on the top right to make it visible.
- Click on ‘Connect Stripe.’
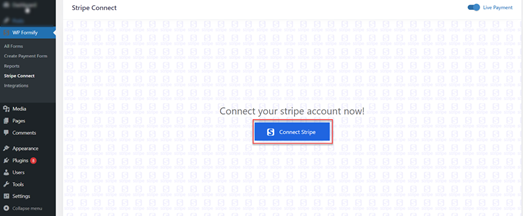
- Now the user will be redirected to the Stripe website.
- Enter the stripe credentials to login.

- Now, you’ll be redirected to the plugin page.

- Select Currencies.
- Click on Save Settings.
Step # 3:
To configure form types, you need to know the two types of payment forms:
- Simple Payments
- Donation Payments
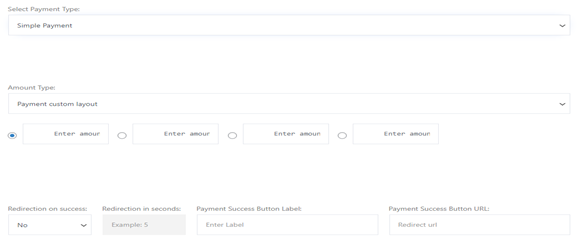
Step # 4:
To configure simple payment:
- Go to form settings.
- Choose the simple payment from payment types.
- Enter the amount and payment success URL.
Step # 5
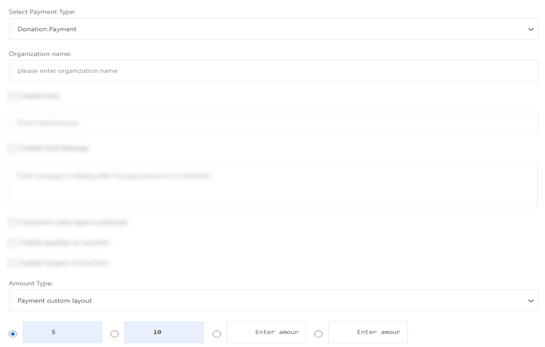
To configure donation payment:
- Hover to Forms Settings.
- Choose Donation Payments from Payment Types.
- Enter the Organization Name.
- You may Enable Goal Amount or Goal Message as well.
- Enter Set or a Custom Account.
- Adjust Payment Success URL.
Step # 6
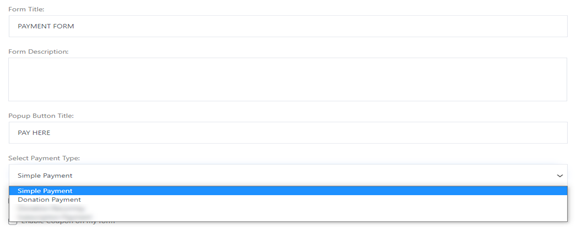
To configure your form, you need to follow the following instances:
- Go to -> Click on Build a Payment Form -> Go to Form Settings
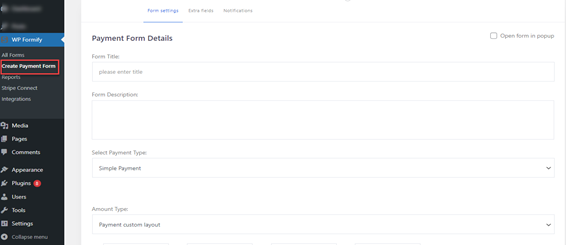
- Fill out the form details.
- Select the payment options (i.e. simple, donation)
- You may allow quantity on your form.
- Select amount type layout (i.e., custom layout or tabular layout).
- Enter the specified amount
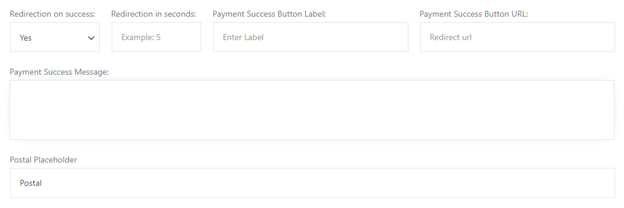
- Enabling the redirection of payment success.
- Enter the payment success button label, payment success URL, payment success message, and postal placeholder.
- Allows the user to enable terms and conditions on my form.
- Enter the terms and conditions link label and the redirect URL.
Step # 7
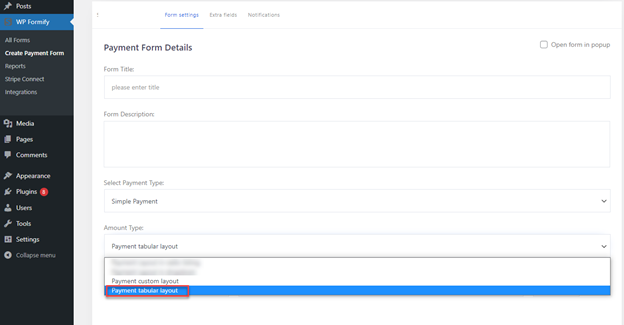
In this step, the user is required to load the payment tabular layout:
- Go to -> WP Formify -> Click on All Forms -> Select a form
- Go to Form Settings -> Click on the Amount Type and Select “Payment Tabular Layout” from the drop-down menu.
- Click on Update Button.

- Once the layout has been selected, the plugin will display settings for the payment layout in the form settings.
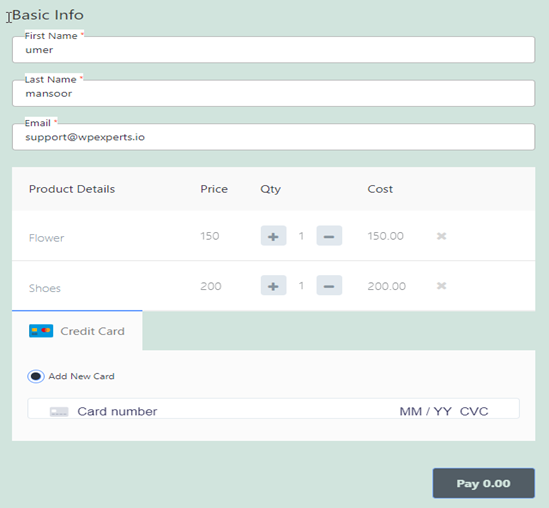
- The price of the product can be easily defined in the price field of the payment layout, and the field can simply accept integer and decimal numbers.
- Click on the quantity field that will enable the user to adjust the quantity of the respective product. The plugin will showcase the set quantity on the front end, which can also be increased or decreased on the front end via clicking “+” or “-” and the plugin will set the amount dynamically based on the number of selected quantities per product.
- Click on “+” will add multiple products to the payment layout, and clicking on “-” will delete the product from the layout in the form settings. Also, you can add multiple products.
- The plugin will highlight the selected settings for the layout on the front-end and enables the user to select from options and make the payment for the selected products.
- The quantity field will be updated dynamically along with the product’s price based on the selected quantity of the particular product on the front-end.
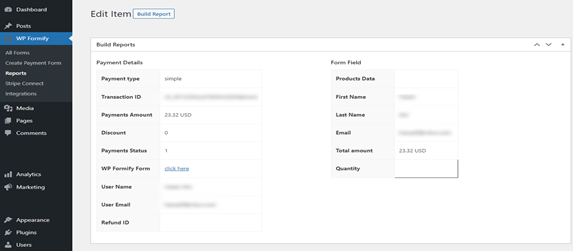
- Once the form is submitted, the plugin will highlight these selected options in the transaction reports tab for the particular payment form.
- Reports can be displayed on the detailed information about the selected products with their cost and quantity in the transaction report within the product data field.
Wrapping Up
In a nutshell, integrating stripe to your website has now become easier than ever before. It is always preferable to use the trusted gateways regarding financial and managerial aspects. If you want to integrate Stripe and start receiving payment from your potential customers without any specified hassle or vice versa, then using WPFormify will work for you. Hence, the above discussion highlights the overall concept of the stripe payment method, WPFormify, along with its integration steps is thoroughly explained and discussed.
To know more about WPFormify, Read the technical documentation here